


Master Typology


/Seam
1.
Copy and Paste the master Smart Seam
Type  and rename the new Seam
Type rule (for example “1/4_Fillet”). Or,
drag the Smart Seam Type icon to the
Process working area below.
2.
Double click on the new created seam
type icon to open properties.
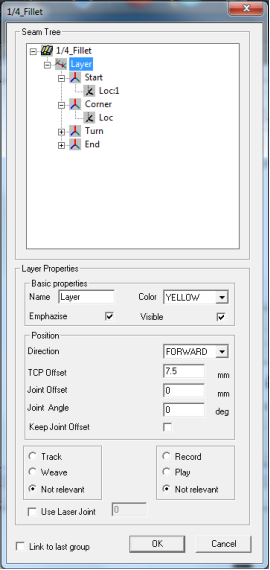
3.
Layer - Click on the layer and right
click the mouse menu. Choose New layer
or Copy and Paste to create as many
layer as needed.
4.
Insert the Layer properties.
5.
Geo - Select Start, Corner, Turn and
End Geo’s and choose the Geo behaviour
(number and type of Locations) for
each Geo.
6.
Location - select each location and fill
the Location Properties.
7.
Click the OK button.
and rename the new Seam
Type rule (for example “1/4_Fillet”). Or,
drag the Smart Seam Type icon to the
Process working area below.
2.
Double click on the new created seam
type icon to open properties.
3.
Layer - Click on the layer and right
click the mouse menu. Choose New layer
or Copy and Paste to create as many
layer as needed.
4.
Insert the Layer properties.
5.
Geo - Select Start, Corner, Turn and
End Geo’s and choose the Geo behaviour
(number and type of Locations) for
each Geo.
6.
Location - select each location and fill
the Location Properties.
7.
Click the OK button.


Create new Seam Type rule () -