


Master Typology/Rules Library/Seam Manipulate


Additional tools - similar to the manual Smart Seam manipulating tools.


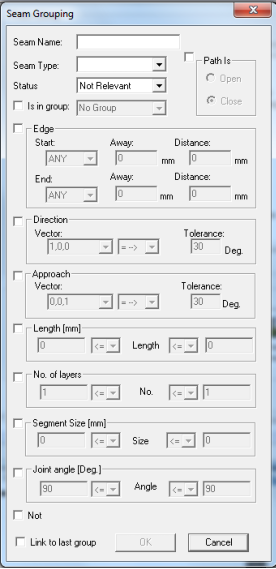
/Seam Grouping
Create new Seam Grouping rule
(group filter) -
1.
Copy and Paste the master Seam
Grouping. Or, drag the Seam Grouping
icon to the Process working area below.
2.
Rename the new Seam Grouping rule.
3.
Double click the new created seam
grouping icon to open properties.
4.
Enter properties.
5.
Click the OK button.
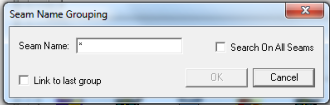
/Name Grouping
Create new Name Grouping rule
(group filter) -
1.
Copy and Paste the master Name
Grouping. Or, drag the Name Grouping
icon to the Process working area below.
2.
Rename the new Name Grouping rule.
3.
Double click the new created name
grouping icon to open properties.
4.
Enter seam name.
5.
Click the OK button.

/Path Grouping
Create new Seam path Grouping
rule (group filter) -
1.
Copy and Paste the master Seam Path
Grouping. Or, drag the Seam Path
Grouping icon to the Process working
area below.
2.
Rename the new Seam Path Grouping
rule.
3.
Double click the new created seam path
grouping icon to open properties.
4.
Select position.
5.
Enter properties.
6.
Click the OK button.
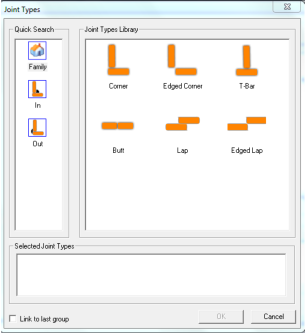
/Joint Type Grouping
Create new Seam Joint Type
Grouping rule (group filter) -
1.
Copy and Paste the master Seam Joint Type
Grouping. Or, drag the Seam Joint Type
Grouping icon to the Process working area
below.
2.
Rename the new Seam Joint Type Grouping
rule.
3.
Double click the new created seam joint
type grouping icon to open the joint types
library.
4.
Drag Joint type icons to the Selected Joint
Types working area below. You can drag
more than one type of joints to create an
array of filters.
5.
Click the OK button.
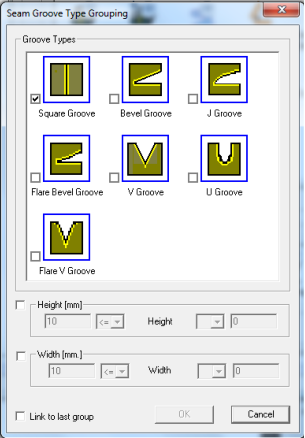
/Groove Type Grouping
Create new Seam Groove Type
Grouping rule (group filter) -
1.
Copy and Paste the master Seam Groove
Type Grouping. Or, drag the Seam
Groove Type Grouping icon to the
Process working area below.
2.
Rename the new Seam Groove Type
Grouping rule.
3.
Double click the new created seam path
grouping icon to open properties.
4.
Select Groove Type.
5.
Enter properties.
6.
Click the OK button.
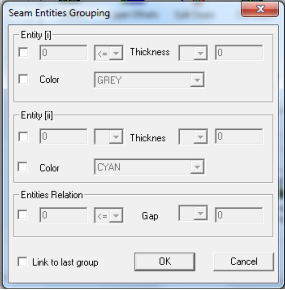
/Entities Grouping
Create new Seam Entities
Grouping rule (group filter) -
1.
Copy and Paste the master Seam Entities
Grouping. Or, drag the Seam Entities
Grouping icon to the Process working area
below.
2.
Rename the new Seam Entities Grouping
rule.
3.
Double click the new created seam Entities
grouping icon to open properties.
4.
Select Entities.
5.
Enter properties.
6.
Click the OK button.
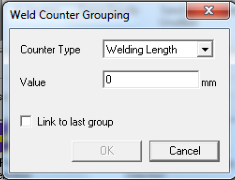
/Weld Counter Grouping
Create new Weld Counter
Grouping rule (grouping for
action) -
1.
Copy and Paste the master Weld Counter
Grouping. Or, drag the Weld Counter
Grouping icon to the Process working
area below.
2.
Rename the new Weld Counter Grouping
rule.
3.
Double click the new created Weld
Counter grouping icon to open
properties.
4.
Enter properties.
5.
Click the OK button.
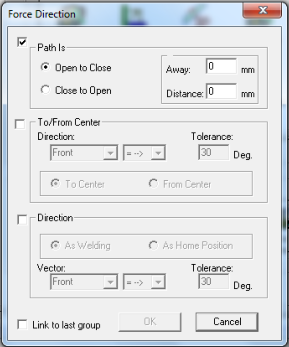
/Force Direction
Create new Force Direction rule
(action) -
1.
Copy and Paste the master Force
Direction. Or, drag the Force Direction
icon to the Process working area below.
2.
Rename the new Force Direction rule.
3.
Double click the new created Force
Direction icon to open properties.
4.
Enter properties.
5.
Click the OK button.

/Seam Manipulate
Create new Seam manipulate rule
(action) - old
1.
Copy and Paste the master Seam
Manipulate Or, drag the Seam
Manipulate icon to the Process working
area below.
2.
Rename the new Seam Manipulate rule.
3.
Double click the new created Seam
Manipulate icon to open properties.
4.
Enter properties.
5.
Click the OK button.
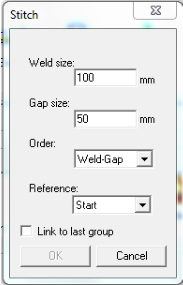
/Stitch
Create new Stitch rule (action) -
1.
Copy and Paste the master Stitch icon.
Or, drag the Stitch icon to the Process
working area below.
2.
Rename the new Stitch rule.
3.
Double click the new created Stitch icon
to open properties.
4.
Enter properties.
5.
Click the OK button.
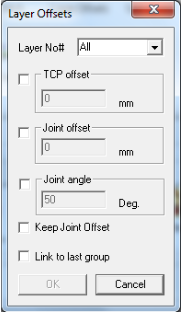
/Layer Offsets
Create new Layer Offsets rule
(action) -
1.
Copy and Paste the master Layer Offsets
icon. Or, drag the Layer Offsets icon to
the Process working area below.
2.
Rename the new Layer Offsets rule.
3.
Double click the new created Layer
Offsets icon to open properties.
4.
Enter properties.
5.
Click the OK button.

/Split Seam
Create new Split Seam rule
(action) -
1.
Copy and Paste the master Split Seam
icon. Or, drag the Split Seam icon to the
Process working area below.
2.
Rename the new Split Seam rule.
3.
Double click the new created Split Seam
icon.
4.
Set the split by percentage value.
5.
Click the OK button.
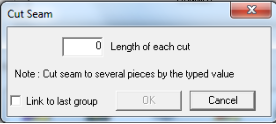
/Cut Seam
Create new Cut Seam rule (action) -
1.
Copy and Paste the master Cut Seam
icon. Or, drag the Cut Seam icon to the
Process working area below.
2.
Rename the new Cut Seam rule.
3.
Double click the new created Cut Seam
icon.
4.
Set the length of each cut.
5.
Click the OK button.
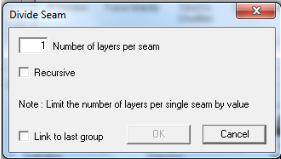
/Divide Seam
Create new Divide Seam rule
(action) -
1.
Copy and Paste the master Divide
Seam icon. Or, drag the Divide Seam
icon to the Process working area
below.
2.
Rename the new Divide Seam rule.
3.
Double click the new created
Divided Seam icon.
4.
Set the number of layers you want to
divide from the multi layer seam.
5.
Click the OK button.
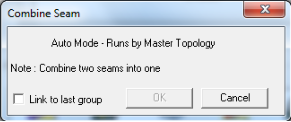
/Combine Seam
Create new Combine Seam rule
(action) -
1.
Copy and Paste the master Combine
Seam icon. Or, drag the Combine
Seam icon to the Process working
area below.
2.
Rename the new Combine Seam
rule.
3.
Double click the new created
Combine Seam icon.
4.
Will combine the current seam with
the following one.
5.
Click the OK button.
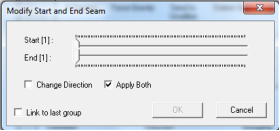
/Modify Start End
Create new Modify Start and
End Seam rule (action) -
1.
Copy and Paste the master Modify
Start and End Seam icon. Or, drag
the Modify Start and End seam icon
to the Process working area below.
2.
Rename the new Modify Start and
End Seam rule.
3.
Double click the new created Modify
Start and End Seam icon.
4.
Set parameters.
5.
Click the OK button.
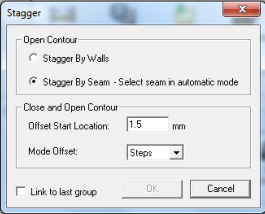
/Stagger
Create new Stagger rule
(action) -
1.
Copy and Paste the master Stagger
icon. Or, drag the Stagger icon to the
Process working area below.
2.
Rename the new Stagger rule.
3.
Double click the new created Stagger
icon.
4.
Select Stagger by Seam, Stagger by
Wall or Close and open Contour.
5.
Set parameters.
6.
Click the OK button.
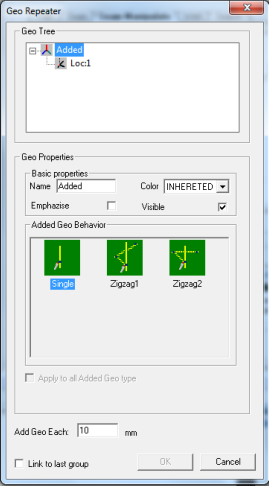
/Geo Repeater
Create new Geo Repeater rule
(action) -
1.
Copy and Paste the master Geo
Repeater icon. Or, drag the Geo
Repeater icon to the Process working
area below.
2.
Rename the new Geo Repeater rule.
3.
Double click the new created Geo
Repeater icon.
4.
Select Geo Behaviour
5.
Select Location by location and set
parameters.
6.
Click the OK button.

/K-Section
Create new K-Section rule
(action) -
1.
Copy and Paste the master K-
Section icon. Or, drag the K-
Section icon to the Process working
area below.
2.
Rename the new K-Section rule.
3.
Double click on the new created K-
Section icon.
4.
Set parameters.
5.
Click the OK button.
/Delete Seam
1.
Drag icon to the process working area.
2.
Force the horizontal plate to be base.
Force Gravity (action) -
/Delete Seam

1.
Send unwanted (filtered) seams out of
the program into a separate folder
2.
Drag icon to the process working area.
Send Unutilize seams to folder
(action) -
/Delete Seam

Delete seams (Action) -
1.
Delete unwanted (filtered) seams.
2.
Drag icon to the process working area.