


Main Screen/Smart Icons/Smart Seam


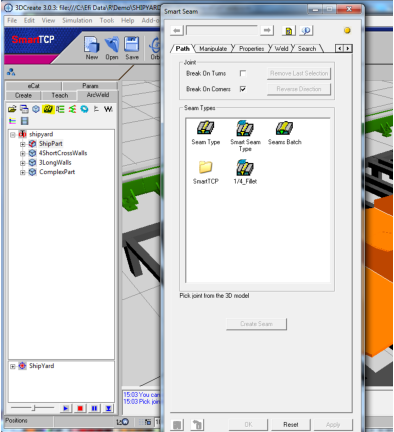


The seam has been created.
It has visual indication on the 3D model and appear on the programming tree on the left side.

/Path
1.
Click the Smart Seam icon.
2.
Select the Path tab.
3.
Click on New Seam (yellow “s”)
Button. 


1.
2.
3.
4.
5.
Click the Seam Type icon, select the
seam type from the drop down menu
and confirm OK . Or, select an
already exist Seam Type.


/Seam Properties

1.
Click the Smart Seam icon.
2.
Select the Properties tab.
3.
Select Layer and set Properties.
4.
To create a new Layer, mouse right click
on “Copy” and then “Paste”. The new
Layer will contain the same properties as
the copied one.
5.
Change Layer parameters - Change the
Layer name, set the Layer position or
select track, weave, record or play.
6.
Select Geo .
7.
Change the Geo name and set the Geo
behaviour.
8.
Select Location .
9.
Change the Location name, set the
position and orientation and select the Arc
setting. Print the welding line number
(Num) from the
welding spreadsheet to set the welding
parameters.
10.
Click the OK button.
and set Properties.
4.
To create a new Layer, mouse right click
on “Copy” and then “Paste”. The new
Layer will contain the same properties as
the copied one.
5.
Change Layer parameters - Change the
Layer name, set the Layer position or
select track, weave, record or play.
6.
Select Geo .
7.
Change the Geo name and set the Geo
behaviour.
8.
Select Location .
9.
Change the Location name, set the
position and orientation and select the Arc
setting. Print the welding line number
(Num) from the
welding spreadsheet to set the welding
parameters.
10.
Click the OK button.


Seam Properties

/Weld
1.
Select seam on the programming tree or
pick one interactively on the model.
2.
Click on the Smart Seam Icon.
3.
Select the Weld tab.
4.
While working in the Weld tab you can
pick the next seam by using the ‘selection
tool’
5.
Change the seam name select the weld
behaviour, choose the robot
configuration, set the torch face and the
location manipulation parameters.
6.
Teach the seam by clicking the Weld
button. Green status indicate success and
red of failure, both indication can be seen
on the programming tree and on the
model in the interactive screen.
7.
In case of failure, change the setup and
try again.
8.
Click the OK button

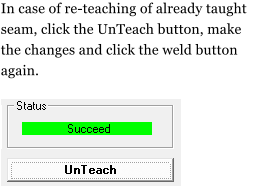
Teaching the robot to Weld
the Seam.
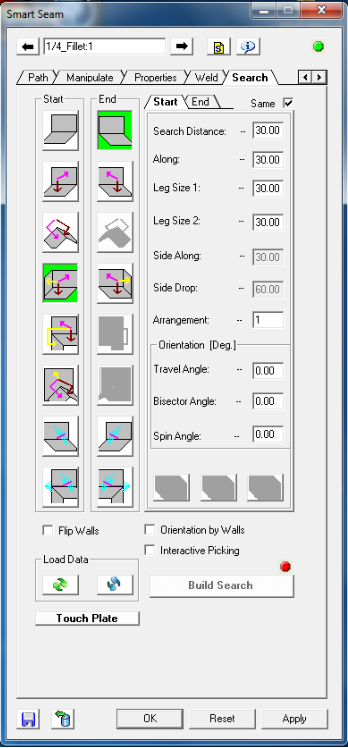
/Search
1.
Select seam on the programming tree or pick
one interactively on the model.
2.
Click on the Smart Seam Icon.
3.
Select the Search tab.
4.
While working in the Search tab you can pick
the next seam by using the ‘selection tool’
5.
Select the desire Start search type icon (none,
two or three touches).
6.
Change the Search legs length and torch
orientation parameters on the Start tab.
7.
Select the desire End search type icon (none,
two or three touches).
8.
Change the Search legs length and torch
orientation parameters on the End tab.
9.
Click on Build Search button. Green color
status indicate success and red color failure,
both indication can be seen on the
programming tree.
10.
In case of failure, change the setup and try
again.


Build Search
Build Search with interactive Picking
1.
Select Interactive Picking.
2.
Use the interactive picking buttons and
touch two or three walls to build the Start
and End searches.
3.
Click on Build Search button.
3.
Click on Build Search button.

Use the Import tool to import
predefine search from your database
to import
predefine search from your database
