


Main Screen/Smart Icons/Smart Seam/Manipulate


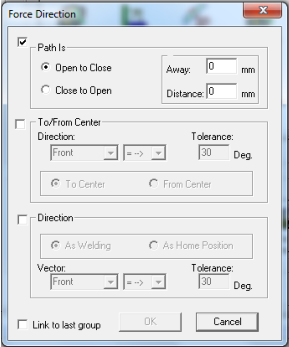
/Force Direction
1.
Select seam on the programming tree
or pick one interactively on the model.
2.
Click the Smart Seam Icon.
3.
Select the Manipulate tab.
4.
Click the Force Direction Icon.
5.
Set parameters and click OK to close
the pop-up window.
6.
Select the Weld tab and teach (Weld)
the seam.
Force the Seam Direction
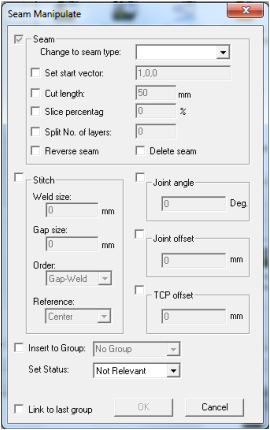
/Seam Manipulate
1.
Select seam on the programming tree
or pick one interactively on the model.
2.
Click the Smart Seam Icon.
3.
Select the Manipulate tab.
4.
Click the Seam Manipulate Icon.
5.
Set manipulating parameters.
6.
Click OK to close the pop-up window.
7.
Select the Weld tab and teach (Weld)
the new created seam.
Seam Manipulate (old)
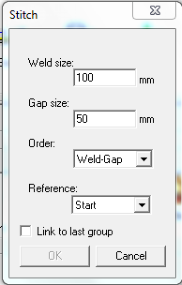
/Stitch
1.
Select seam on the programming tree
or pick one interactively on the model.
2.
Click the Smart Seam Icon.
3.
Select the Manipulate tab.
4.
Click the Stitch Icon.
5.
Set parameters and click OK to close
the pop-up window.
6.
Select the Weld tab and teach (Weld)
the new created seam.
Stitch Weld
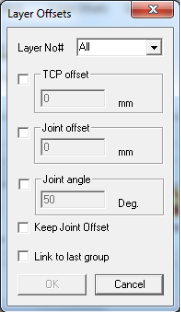
/Layer Offsets
1.
Select seam on the programming tree
or pick one interactively on the model.
2.
Click the Smart Seam Icon.
3.
Select the Manipulate tab.
4.
Click the Layer Offsets Icon.
5.
Select Layer and set the offsets
parameters.
6.
Click OK to close the pop-up window.
7.
Select the Weld tab and teach (Weld)
the seam.
Layer Offsets
1.
Select seam on the programming tree
or pick one interactively on the model.
2.
Click the Smart Seam Icon.
3.
Select the Manipulate tab.
4.
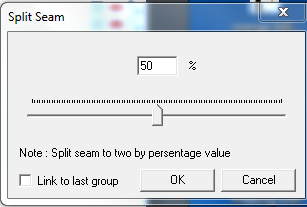
Click the Split Seam Icon.
5.
Move the cursor to desire value.
6.
Click OK to close the pop-up window.
7.
Select the Weld tab.
8.
Select the first new created seam,
teach it (Weld) or delete it.
9.
Select the second new created seam,
teach it (Weld) or delete it.
/Split Seam
Split Seam
/Cut Seam
1.
Select seam on the programming tree
or pick one interactively on the model.
2.
Click the Smart Seam Icon.
3.
Select the Manipulate tab.
4.
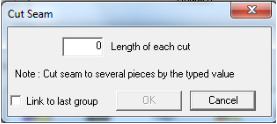
Click the Cut Seam Icon.
5.
Enter the desire length of each cut.
6.
Click OK to close the pop-up window.
7.
Select the Weld tab.
8.
Select the new created seams one by
one and teach them (Weld) or delete
them.
Cut Seam

/Divide Seam
1.
Select seam on the programming tree
or pick one interactively on the model.
2.
Click the Smart Seam Icon.
3.
Select the Manipulate tab.
4.
Click the Divide Seam Icon.
5.
Enter the number of layers per seam
and select Recursive if you want the to
repeat your selection.
6.
Click OK to close the pop-up window.
7.
Select the Weld tab.
8.
Select the first new created seam and
teach it (Weld) or delete it.
9.
Select the second seam and teach it
(Weld) or delete the it.
10.
repeat for all new created seams.
Divide Seam
1.
Select seam on the programming tree
or pick one interactively on the model.
2.
Click the Smart Seam Icon.
3.
Select the Manipulate tab.
4.
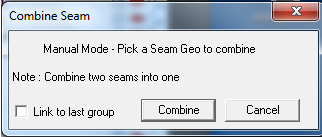
Click the Combine Seam Icon.
5.
Click Combine to close the pop-up
window. The selected seam will be
combined, with the next seam on the
programming tree, into one seam.
6.
Select the Weld tab and teach (Weld)
the new created seam.
/Combine Seam
Combine two Seams
/Modify Start End
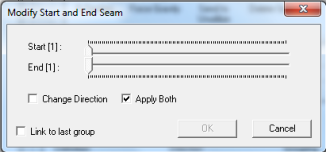
Stagger for multi pass seams
1.
Move the Start or End slider to the next
Geo.
2.
Apply Both will move the two sliders
together.
3.
Shorten or lengthen the seam, ,mainly
used with positioner.
4.
Click the OK button
/Stagger
1.
Select multi pass seam and double
click on it.
2.
Select and click the second multi pass
seam to combined.
3.
Click the OK button
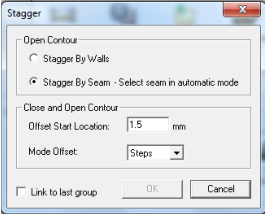
Stagger for multi pass seams
Stagger by Seam
1.
Select multi pass seam and double
click on it.
2.
Select and click the wall.
3.
Click the OK button
1.
Select multi pass seam, Set
parameters.
2.
Click the OK button.
Stagger by Wall
Close and Open Contour
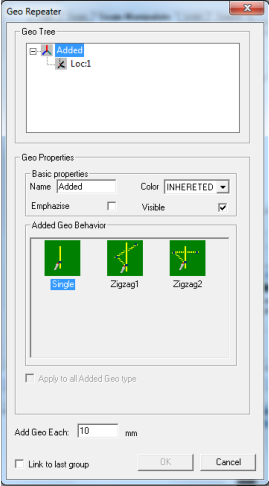
/Geo Repeater
Geo Repeater
1.
Select seam on the programming tree
or pick one interactively on the model.
2.
Click the Smart Seam Icon.
3.
Select the Manipulate tab
4.
Click the Geo Repeater icon.
5.
Select Geo Behaviour  .
6.
Select Location in the Geo Tree.
7.
Change Name, set Position,
Orientation and Arc behaviour.
8.
Click the OK button
.
6.
Select Location in the Geo Tree.
7.
Change Name, set Position,
Orientation and Arc behaviour.
8.
Click the OK button
.
6.
Select Location in the Geo Tree.
7.
Change Name, set Position,
Orientation and Arc behaviour.
8.
Click the OK button

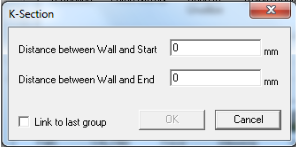
/K-Section
1.
Select seam on the programming
tree or pick one interactively on the
model.
2.
Click the Smart Seam Icon.
3.
Select the Manipulate tab.
4.
Click the K-Section Icon.
5.
Enter the distance of the first
location from the wall at start or
end.
6.
Click OK to close the pop-up
window.
7.
Select the Weld tab and teach
(Weld) the new created seam. .
Move the Start and End
locations.
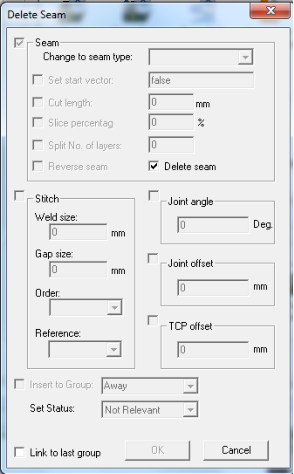
/Delete Seam
Delete seam -
1.
Delete selected seam.