


Main Screen/Smart Icons/Smart Model


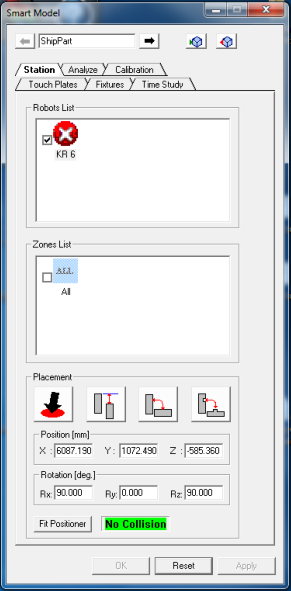
/Station
1.
 - Insert or Remove the Model
Part in and out of the project.
2.
Robot List - make sure that the robot is
selected.
3.
Zone List - select the working zone (in case
of more than one working zone)
4.
Placement - Choose the model you want to
place
5.
Place the model with the placement tools
and/or with the Position and Rotation fields.
Scroll the mouse-wheel to change values;
Shift-mouse-wheel to change values by
tenfold and Ctrl-mouse-wheel to change
values by hundredfold.
6.
Click OK.
- Insert or Remove the Model
Part in and out of the project.
2.
Robot List - make sure that the robot is
selected.
3.
Zone List - select the working zone (in case
of more than one working zone)
4.
Placement - Choose the model you want to
place
5.
Place the model with the placement tools
and/or with the Position and Rotation fields.
Scroll the mouse-wheel to change values;
Shift-mouse-wheel to change values by
tenfold and Ctrl-mouse-wheel to change
values by hundredfold.
6.
Click OK.


Placing the Model
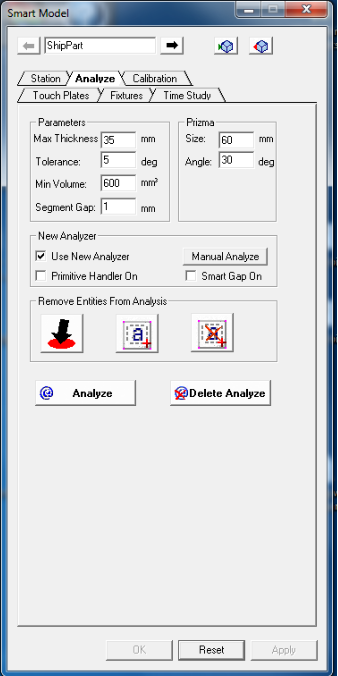
1.
Click on the Smart Model Icon.
2.
Select the Analyze tab.
3.
Set the parameters.
4.
Click the ‘Analyze’ button.
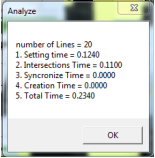
5.
Click OK on the pop-up window.
6.
Close the Smart Model window
7.
Save project
5.
Click OK on the pop-up window.
6.
Close the Smart Model window
7.
Save project
Note: Next time you will open the
project, the model will be already
analyzed.
/Analyze

Analyzing the Entire Model
Analyzing Part of the Model
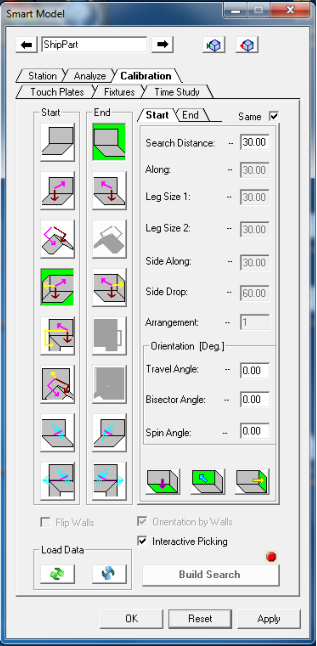
/Calibration
1.
Click on the Smart Model Icon.
2.
Select the Calibration tab.
3.
While working in the calibration tab you can
pick the next part in your project by using the
‘selection tool’
4.
Select the desire Start search type icon (none,
two or three touches).
5.
Change the search legs length and torch
orientation parameters on the Start tab.
6.
Select the desire End search type icon (none,
two or three touches).
7.
Change the search legs length and torch
orientation parameters on the End tab.
8.
Click on Build Search button. Green color
status indicate success and red color failure,
both indication can be seen on the
programming tree.
9.
In case of failure, change the setup and try
again.
10.
Click the OK button.


Build Search for Part Calibration
Build Calibration Search with
interactive Picking
1.
Select Interactive Picking.
2.
Use the interactive picking buttons and
touch two or three walls to build the Start
and End searches.
3.
Click the Build Search button.
3.
Click the Build Search button.

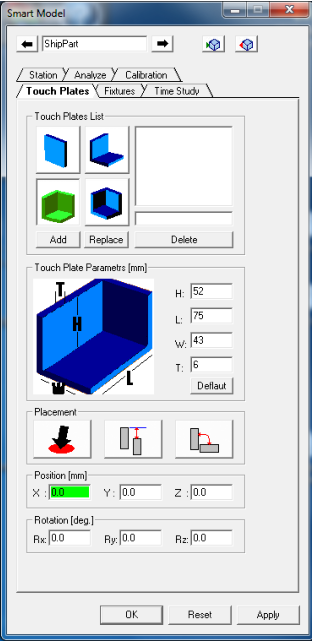
/Touch Plates
Touch Plate Placement
1.
Click the Smart Model Icon.
2.
Select the Touch Plate tab.
3.
Select Touch Plate type from the icons List.
4.
Click Add button (replace or delete) to add
touch plate to the working area.
5.
Select touch plate from the working area.
6.
Change Touch Plate parameters.
7.
Place the Touch Plate on the model in the
interactive screen using the placement tools
and the Position and Rotation fields.
8.
Scroll the mouse-wheel to change values;
Shift-mouse-wheel to change values by
tenfold and Ctrl-mouse-wheel to change
values by hundredfold.
9.
Click the OK button.
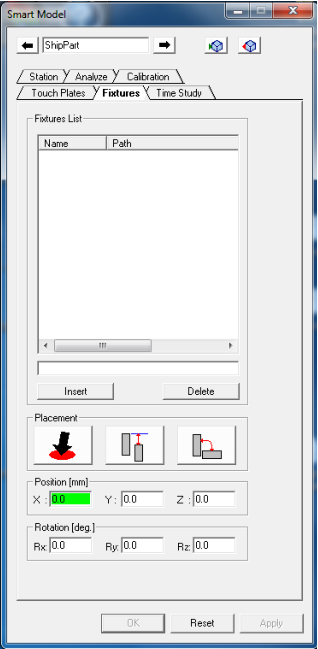
/Fixtures
Fixture Placement
1.
Click the Smart Model Icon.
2.
Select the Fixture tab.
3.
Click the Insert button and add the 3D
Fixture model from your files. Insert as
many Fixtures as you need.
4.
Select Fixture.
5.
Place the fixture on the model in the
interactive screen using the placement
tools and the Position and Rotation fields.
6.
Scroll the mouse-wheel to change values;
Shift-mouse-wheel to change values by
tenfold and Ctrl-mouse-wheel to change
values by hundredfold.
7.
Click the OK button.
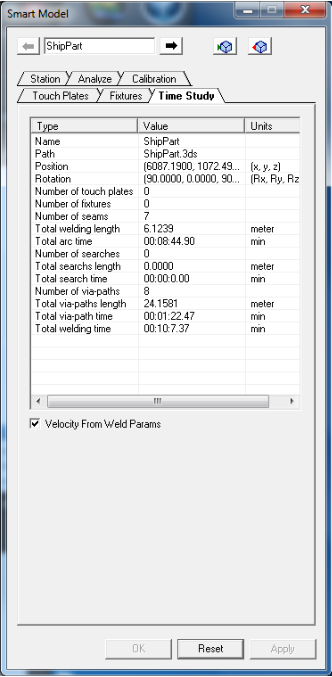
Find out the statistics about
your project.
/Time Study
1.
Click the Smart Model Icon.
2.
Select the Time Study tab.
3.
Click the OK button.