


Open existing Project

Main Screen/Smart Icons/Smart Via Path


1.
Select seam on the programming tree or
pick one interactively on the model.
2.
While working with the Smart Via Path
you can pick the next seam by using the
‘selection tool’  3.
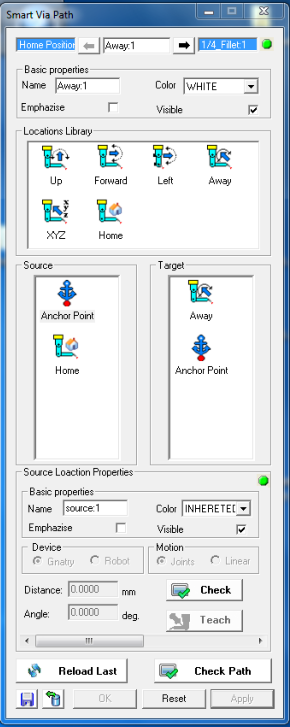
You will find Anchor Point icon on
both Source and Target. (In case of first
seam on the programming tree you will
find Home icon at Source section and with
last seam you will find the Home icon at
the Target section).
4.
Drag the Away icon into the Source
area and make sure that the distance and
angle are good for the case.
5.
Drag the Up icon into the Source area
and make sure that the distance and angle
are good for the case.
6.
Do the same for the Target area in reverse
order; Up first and Away second.
7.
If needed use the other icons direction to
improve your Via Path.
8.
Click the Check Path button. Green status
indicate success and red of failure, both
indication can be seen on the
programming tree.
9.
In case of failure, change the setup and try
again.
10.
You can save , the new created Via
Path, as rule to the database.
11.
Alternatively - use the Import tool to
import predefine search rule from your
database.
3.
You will find Anchor Point icon on
both Source and Target. (In case of first
seam on the programming tree you will
find Home icon at Source section and with
last seam you will find the Home icon at
the Target section).
4.
Drag the Away icon into the Source
area and make sure that the distance and
angle are good for the case.
5.
Drag the Up icon into the Source area
and make sure that the distance and angle
are good for the case.
6.
Do the same for the Target area in reverse
order; Up first and Away second.
7.
If needed use the other icons direction to
improve your Via Path.
8.
Click the Check Path button. Green status
indicate success and red of failure, both
indication can be seen on the
programming tree.
9.
In case of failure, change the setup and try
again.
10.
You can save , the new created Via
Path, as rule to the database.
11.
Alternatively - use the Import tool to
import predefine search rule from your
database.


Create Via-Path


